1. Apidog CLI
Apidog API
  • Introduction
  • API Versions
  • Authentication
  • Import & Export
    • Import OpenAPI/Swagger Data
      POST
    • Import Postman Collection Data
      POST
    • Export Data in OpenAPI/Swagger Format
      POST
  • Team Access Grants
    • Assign a team role via the external API
      POST
  • Project Access
    • Find Team Projects by Exact Match
      GET
    • Find Accessible Teams by Exact Match
      GET
    • Grant or Invite Project Access
      POST
    • List Available Project Roles for a Team
      GET
  • Organization Teams
    • Create organization team
      POST
  • Apidog CLI
    • Overview
    • Installing Apidog CLI
    • Apidog CLI Commands & Options
    • Use Apidog CLI with an AI Agent
  • Schemas
    • TeamRole
    • ErrorResponse
    • ProjectAccessMode
    • CreateTeamAccessGrantRequest
    • TeamAccessGrant
    • CreateTeamAccessGrantResponse
  1. Apidog CLI

Installing Apidog CLI

Apidog CLI lets you use Apidog from the command line, CI/CD pipelines, and AI Agents. It can run test scenarios and also manage project resources such as API documentation, schemas, mocks, environments, variables, branches, and Markdown documents.

Prerequisites#

Node.js v16 or later installed on your system
npm (Node Package Manager) installed
An Apidog account with test scenarios created

Installing Apidog CLI#

Apidog CLI is built on Node.js. To run Apidog CLI, please install Node.js before using it.
The Apidog CLI relies on Node.js version v16 or later.
Install Apidog CLI globally so you can run it from anywhere:
npm
Install with AI Agent
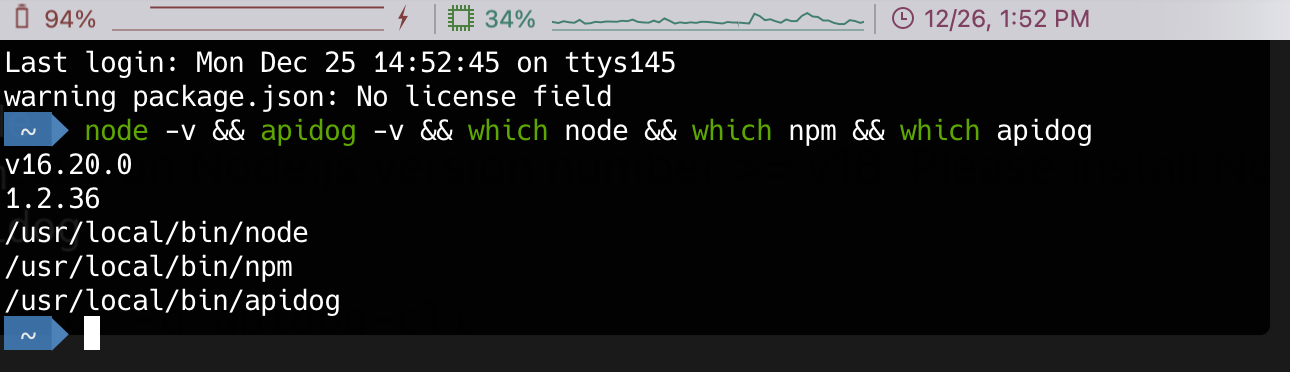
Here are some commands to verify if Apidog CLI is installed successfully.
If installed successfully, it will directly print the version number and installation path after executing commands above.
Terminal output showing successful Apidog CLI installation with version numbers and paths
Installation command stuck with no progress or error?
If the Apidog CLI installation command gets stuck without output or errors, it is usually related to network or permission issues.
We recommend sending the full command and terminal output to your AI Agent so it can help identify the cause.
How do I connect Apidog CLI to Apidog Europe?

Updating Apidog CLI#

Use the command below to upgrade Apidog CLI.

Log In to Your Account#

After installation, log in to your Apidog account. The CLI stores account information locally and uses the current account for later commands.
If you already have an access token, you can use it directly:
View logged-in accounts and the current account:
Switch accounts when multiple accounts are logged in:

SKILL: Use with AI Agents#

To use Apidog CLI with AI Agents such as Cursor, Claude Code, Trae, or Codex, install the companion Skill:
The Skill helps AI Agents understand Apidog CLI commands, options, and workflows.

Common Command Entry Points#

View all available commands:
View details for a specific command:
For example:

Run Test Scenarios#

Running test scenarios is a common use case for Apidog CLI. First, create and orchestrate a test scenario in Apidog. Then you can run it from the command line and get a test report.
The Apidog CLI supports two ways of running:
1.
Running with online data: This is suitable for live scenarios.
2.
Running with exported test scenarios: This is suitable for offline scenarios.

Run Online Data in Real Time#

1
In a test scenario, switch to the CI/CD tab.
CI/CD tab in Apidog test scenario interface
2
Configure the environment, test data, iterations, delay, etc.
3
In the CI/CD provider section, select "Command line".
4
Click "Add access token" button and then "Generate token".
Learn more about access token.
5
Click the command to copy it.
6
Paste and run the command in the command line. And you'll get a test report in command line.
In Step 2, the configurations you set will automatically determine the options and values utilized in the CLI:
Environment: Maps to -e <environmentId>.
Test data: Maps to -d <testDataId>.
Iterations: Maps to -n <n>.
Delay: Maps to --delay-request <n>.
Environment/Global variables: If selectingExport current value and use it, you can find an export option below to export the current values of the environment/global variables from your project to a file. This affects--variables <path>. You will need to import this file onto the machine running the CLI and specify its path via--variables <path>. Learn more about differences between "Use initial value" and "Export current value and use it" here.
If your test scenario also uses locally stored database connection configurations, the product interface will guide you to export these configurations to a local file, which affects --database-connection <path>. You will then need to import this exported file onto the machine running the CLI and specify its path in--database-connection <path>.

Run Exported Data#

This options allows you to run offline tests locally using exported files.
1
In a test scenario, switch to the CI/CD tab.
2
Configure the environment, test data, iterations, delay, etc.
3
In the CI/CD provider, select "Command line" and then switch to "Run exported data".
Run exported data option in CI/CD configuration
4
Export the test scenario as a JSON file.
5
Copy the command displayed below.
6
Paste and run the command in the command line. You will get a command line test report.
The settings in step 2 (such as "Run Online Data") will automatically affect the options and values used in the CLI below. Note that when running in this way, the environment/global variables use the values from the file exported along with the test scenario. Learn More

CLI Test Report#

After running the CLI, you will receive a command-line test report that includes execution statistics for test scenarios and validation and assertions for failed requests.
Example CLI test report showing test results and statistics
You can also find the /apidog-reports/ directory in the folder where you ran the CLI. This directory contains the CLI test report in HTML format.

Options#

Apidog CLI provides a rich set of options to customize a collection run. Learn more at Apidog CLI Commands & Options.
Modified at 2026-09-03 04:09:27
Previous
Overview
Next
Apidog CLI Commands & Options
Built with